

Applies to
- Windows 10 Pro (or better)
- Windows 11 Pro (or better)
By enrolling the PC into Intune/Endpoint Manager, you’ll get secure access to work apps on the PC, and access to business authorised applications via the Company Portal.
The Company Portal application also makes sure that your device settings meet the businesses requirements, and synchronises required configurations (like device applications, configuration policies, and updates) from your IT Team to the device.
How does this change affect me?
- You’ll need to enrol your device into Intune/Endpoint Manager (These are the same systems; Microsoft likes to rename systems as they evolve).
- You will go through a one-time set up to access the company network, email, and files.
- You may be asked to add or change your authentication method to keep your access and PC safe.
- You will be able to install company approved apps from the Intune Company Portal or the Managed Google Play Store.
- You will be able if needed, to use self-service troubleshooting from Intune Company Portal or the Managed Google Play Store.
- If your device is lost or stolen, you can erase company data yourself or contact IT to keep your data safe.
What happens on all devices after enrolment
After you enrol a PC for work:
- You can access your businesses network, email, and work files on the PC.
- You can install work applications from the Company Portal applications yourself and access them by signing into your work account.
- Your work email is automatically set up.
- You or your IT Team can reset your PC to factory settings if it’s lost or stolen.
What happens on Windows PCs after enrolment
Specific to Windows PC’s after they are enrolled in Intune/Endpoint Manager:
- Software installs on the device that enables your IT Team to manage the device. Your support person can automatically update this software.
- Anti-malware and Anti-virus software is installed on the device.
- Your PC is checked that it meets device and security requirements. The IT Team cannot view or make changes to anything on your hard drive.
- Your IT Team can install work apps and updates on the device.
IT Team Support Permissions
When you enrol the PC, you are giving IT support permission to:
- Reset your device back to the manufacturers default settings. This is helpful if the device is lost or stolen.
- Remove work-related files and business apps. Personal data and settings are not removed.
- See the software installed on the device, including software you may have personally installed.
- Set requirements on your device, like requiring you to have a device password or PIN. As another example, your business could limit how many times you can enter an incorrect password and lock you out of the device after too many failed attempts.
- Require you to encrypt the data on your device to help protect company data, in case your device is lost or stolen.
- Require you to accept terms and conditions.
- Block you from using the device camera or screenshot feature.
For Bring Your Own Devices (BYOD) see: “What information can my organization see when I enroll my device?“
These requirements are in line with laws, regulations and business policies and are described in the IT Security Policies. These configurations are compliance requirements, before access to company information and applications can be allowed. For more information about privacy and your specific enrolment scenario, see your businesses privacy statement.
Device Synchronising for updates
Every eight hours, enrolled devices synchronise with Intune/Endpoint Manager to get the latest updates and policies from your business. During check-in the device can:
Next steps
Make sure your PC has a connection to the internet.
Make sure you have your work user account details and the contact details for your IT support person. For contact information, check the Company Portal website.
For Windows PCs, Identify the version of Windows currently installed. To identify the version of Windows running on your device, see Which version of Windows operating system am I running?.
You should have a minimum of Windows 10 version 1607 Pro or Windows 11 Pro before you start. Windows Home does not typically meet the minimum business security requirements. Comparison of Windows Versions

If you have Windows Home or any other questions, please call your IT support person before you proceed any further.
Video step through of what happens next.
Get Company Portal.
You can enrol Windows 10/11 devices through the Intune Company Portal website or application.
To access Company Portal:
- Install the app from the Microsoft Store.
- Sign on to the Company Portal website with your work account credentials.
Enrol Windows 10, version 1607 and later device.
Use Intune Company Portal to enrol PCs running on Windows 10, version 1607 Pro and later, and Windows 11 Pro.
- Open Company Portal and sign in with your work account.
- On the Home screen, select Next to set up your device.
 Set up your device screen, showing that the device needs to be set up to connect to work and highlighting the Next button.”>
 - Select Connect.

- On the Setting up your device screen, select Go.
- After setup is complete, return to the Company Portal app. Select Next.
- Select Done to exit setup. You’re all set screen, highlighting the Done button.”>
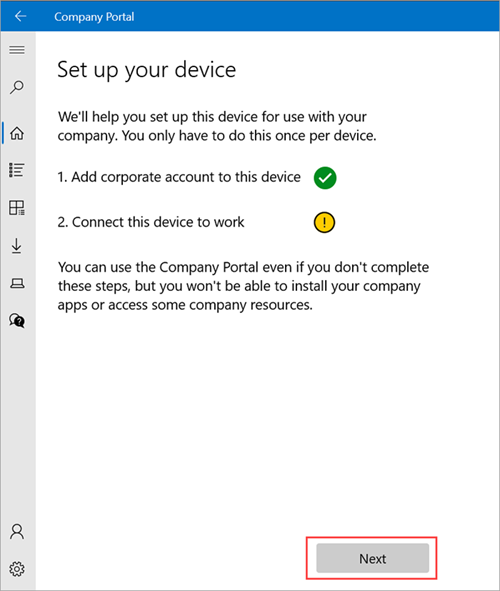 Set up your device screen, showing that the device needs to be set up to connect to work and highlighting the Next button.”>
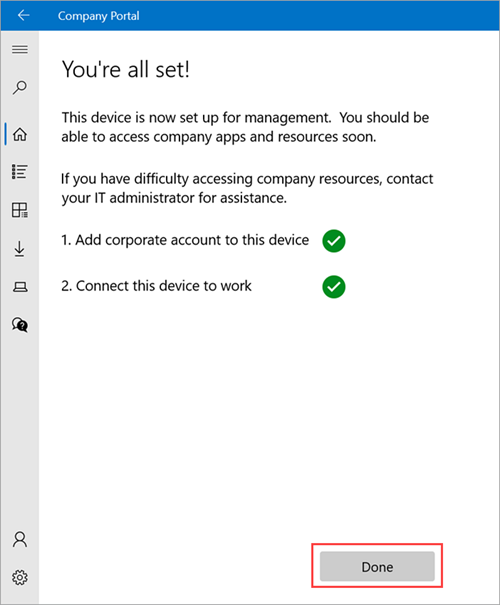 You’re all set screen, highlighting the Done button.”>
Synchronise the device to fix connection problems.
After enrolling, if you have trouble accessing work “things”, try synchronising your device.
Synchronise the enrolled device you’re using for work to get the latest updates, requirements, and communications from your business.
The Company Portal application regularly synchronises devices as long as you have an Internet connection to your PC. However, if you ever need to disconnect for an extended period of time, you can manually sync the device when you return to get any updates you missed.
Synchronising can also help resolve work-related downloads or other processes that are in progress or stalled. If you’re experiencing slow or unusual behaviour while installing or using a work app, try synchronising your device to see if an update or requirement is missing.
Sync from Company Portal app for Windows.
Complete these steps to synchronise the PC using the Company Portal app. You can synchronise devices running Windows 10 version 1703 pro or later, and Windows 11 pro.
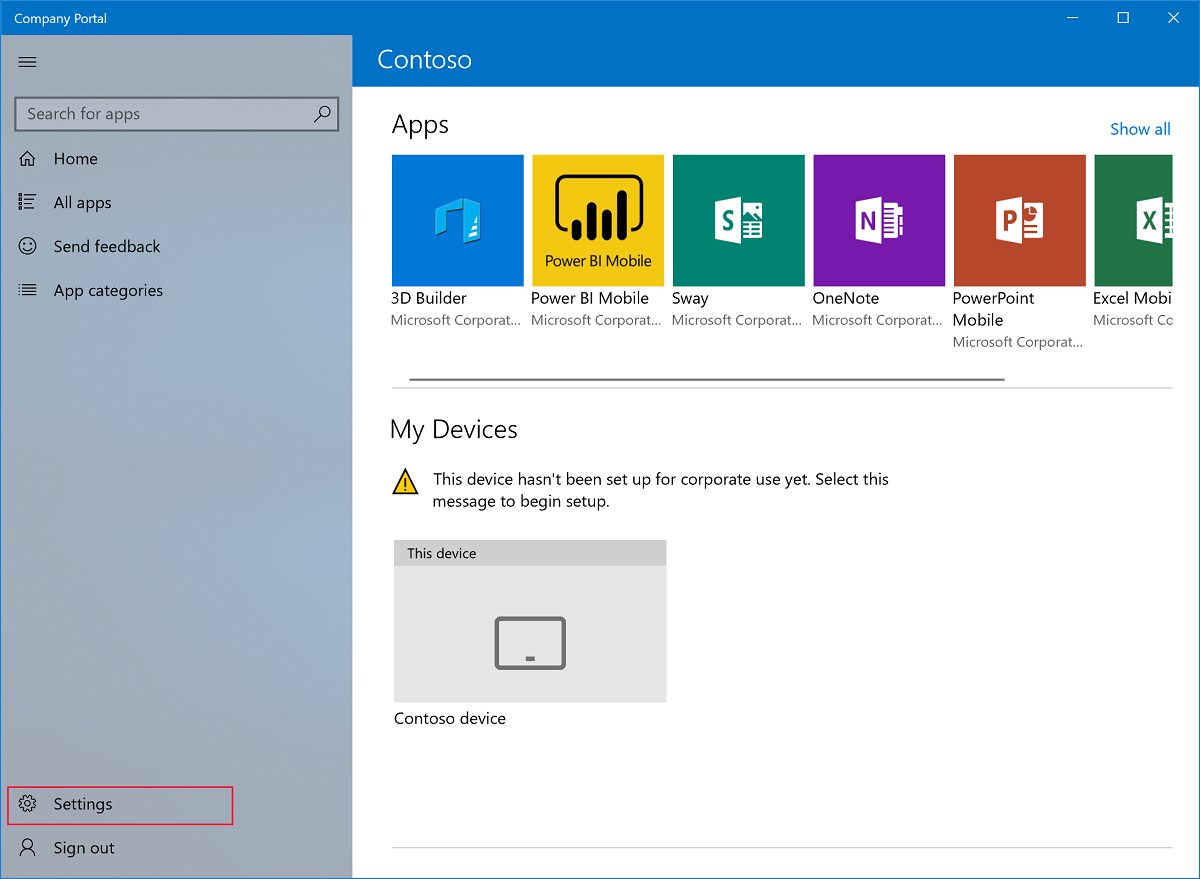
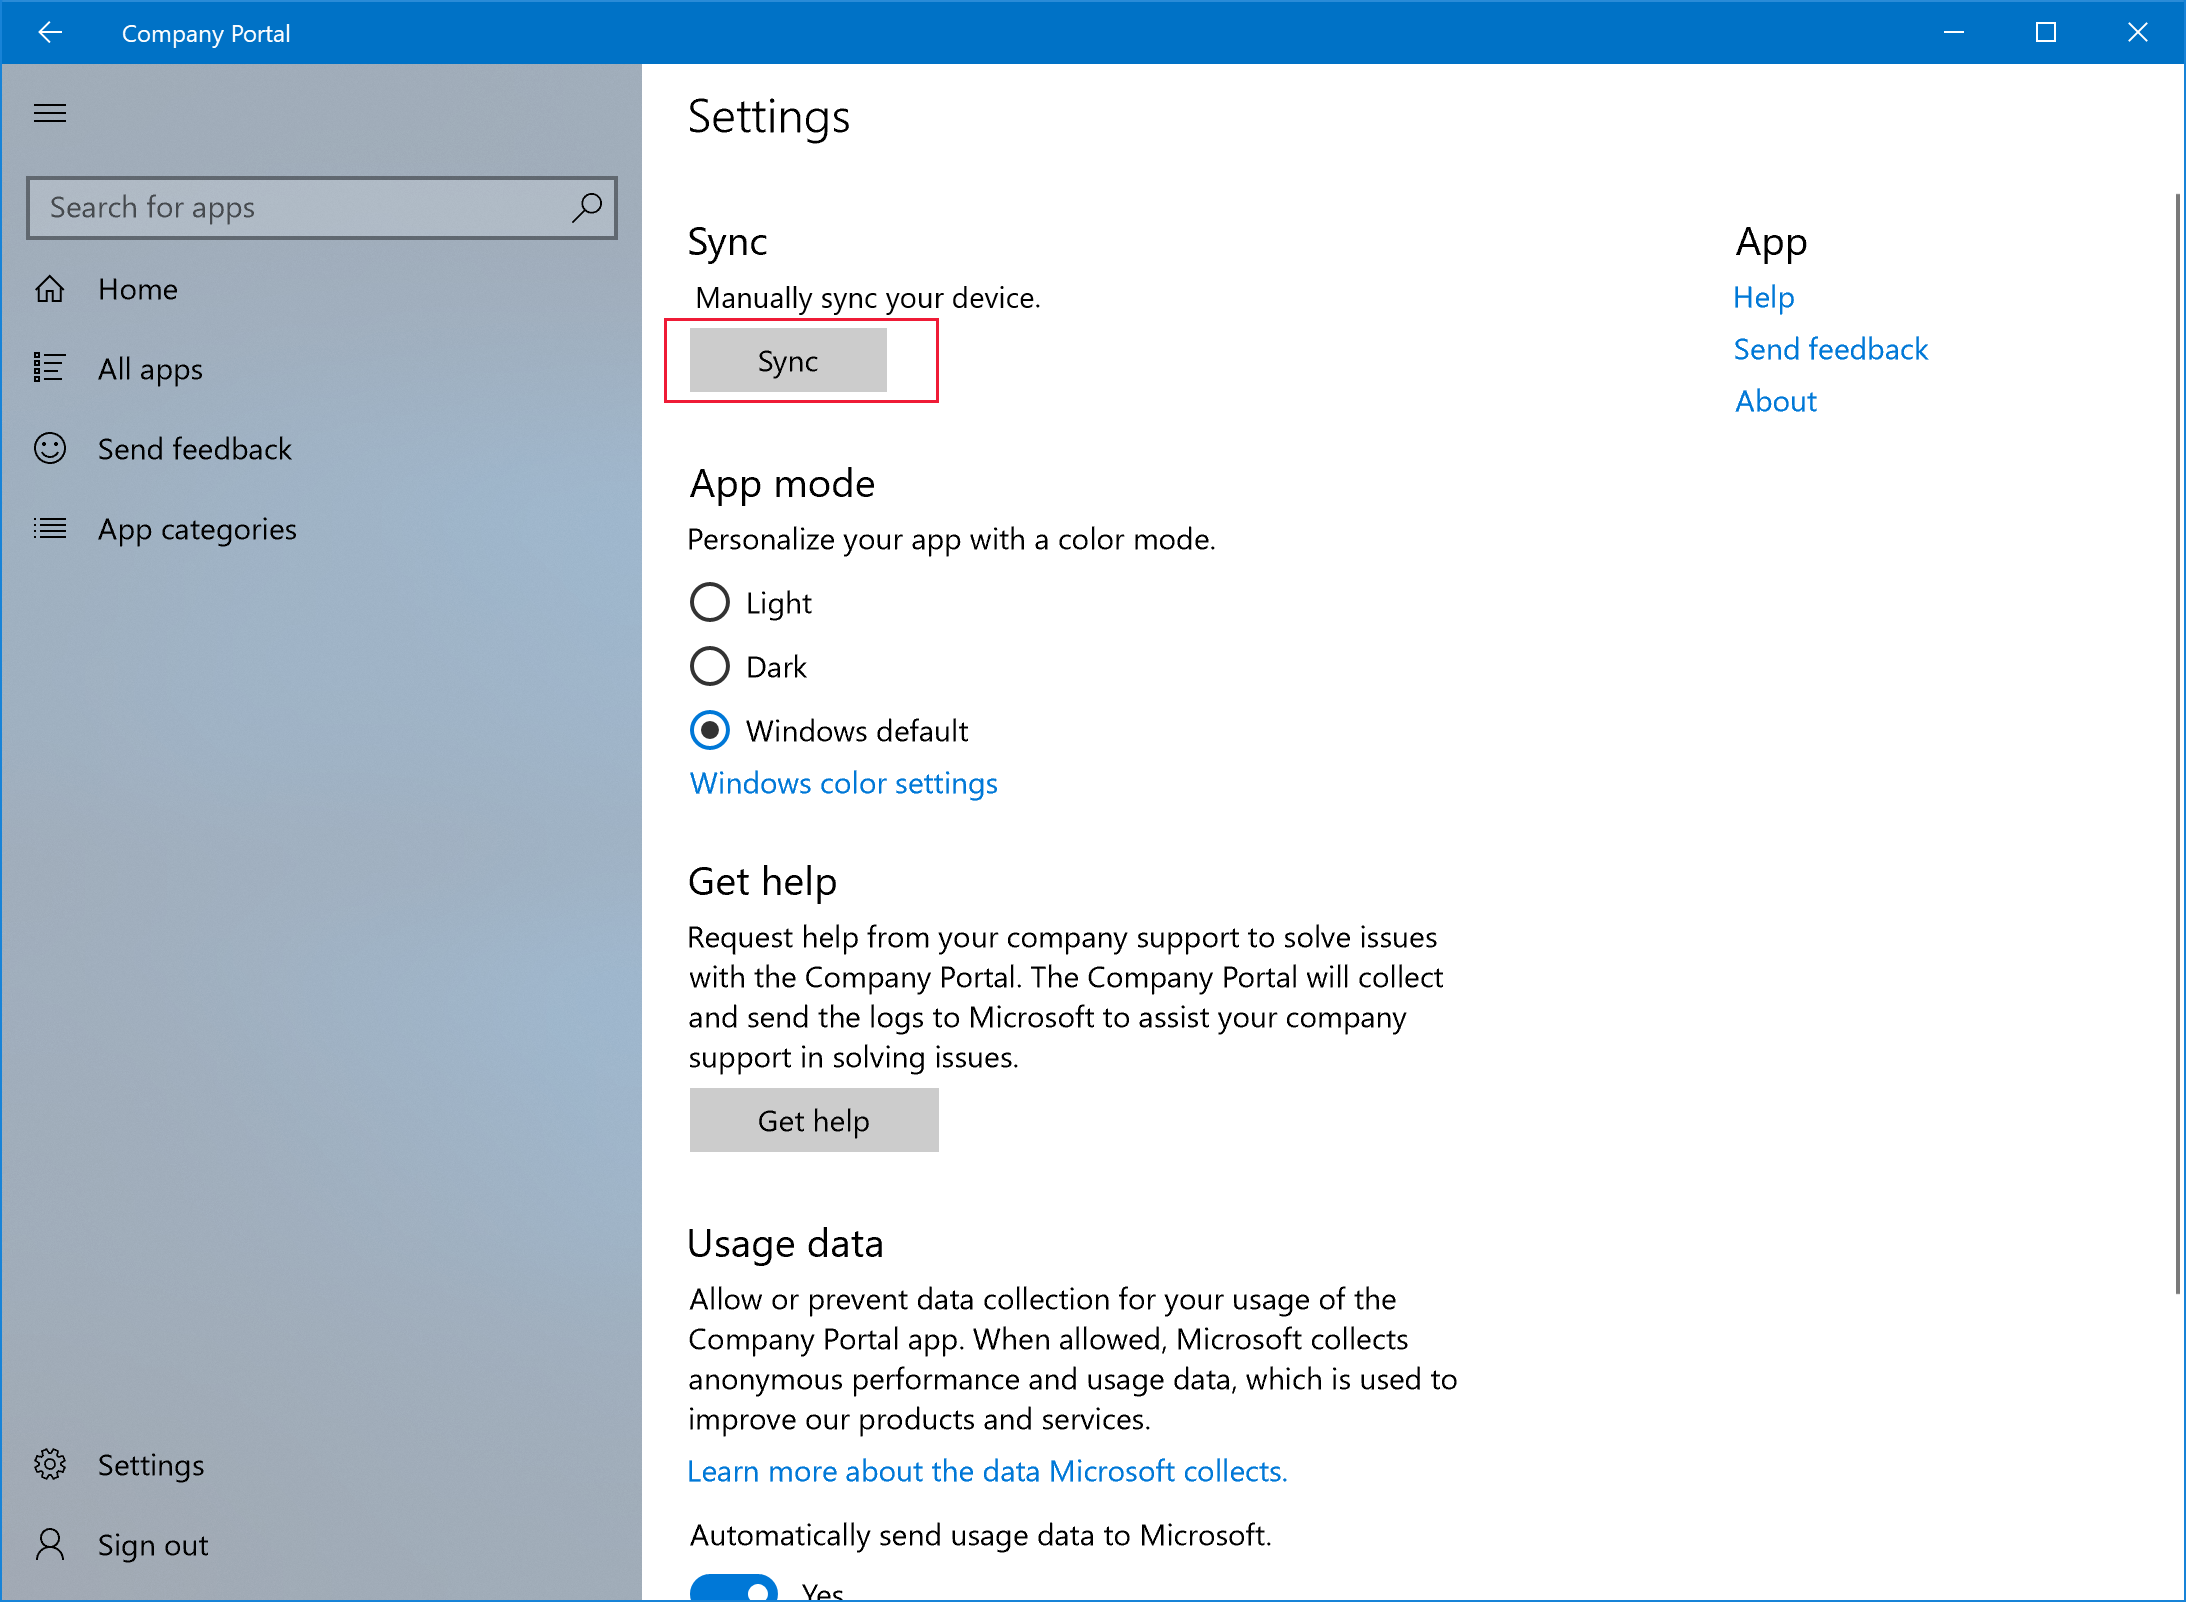
- Open the Company Portal app on your device.
- Select Settings > Sync.
Synchronise from device taskbar or Start menu.
You can access the Company Portal synchronising action from the PC’s desktop. This way is useful if you have the app pinned directly to your taskbar or Start menu and want to quickly synchronise.
- Find the Company Portal app icon in your taskbar or Start menu.
- Right-click the app’s icon so its menu (also referred to as a jump list) appears.
- Select Sync this device. The Company Portal app opens, and the synchronisation begins.
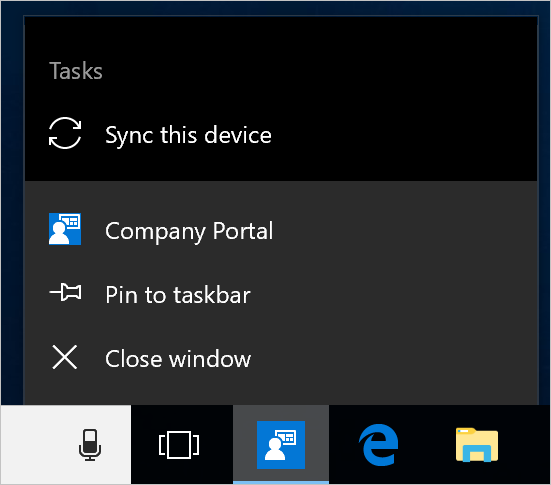
Synchronise from Settings app (Windows 10 or later).
Synchronise devices running Windows 10 or later from the system Settings app.
- On your device, select Start > Settings.
- Select Accounts.
- Select the option that matches your onscreen experience.
- If your screen shows the Access work or school option, go to Access work steps in this post.
- If your screen shows the Work access option, jump to Work access steps in this article.
- If your screen shows the Access work or school option, go to Access work steps in this post.
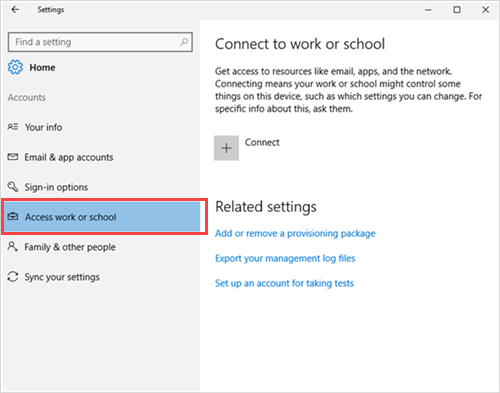
Access work steps.
- Select Access work or school.
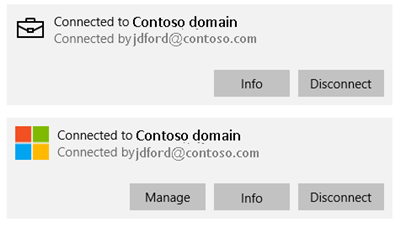
- Select your work account, which is marked with a briefcase icon or Microsoft log
- Select Info.
- Select Sync.
Work access steps.
- Select Work access.
- Under Enrol into device management, select the account that’s associated with your workplace.
- Choose Sync. The button remains greyed out (inactive) until the synchronisation is complete.
Next steps
Should you need more help setting up your PC or using Company Portal, contact your IT support person.
Sign in to the Company Portal website for your businesses IT Team’s contact information.